All that said, I finally reshot that video tonight. It's still not perfect, but it's better! Here it is:

Showing posts with label Technique. Show all posts
Showing posts with label Technique. Show all posts
08 December 2015
Contiguous Sleeve Method: Revisited
A few years ago, I took a shot at doing some Youtube videos where I talked about knitting. They weren't super popular, what a shock. BUT I did get the occasional email from Youtube letting me know that someone out there HATED my video on the Contiguous Sleeve Method because I had (admittedly) awful music on it to cover up the bad audio hum on the clip.
All that said, I finally reshot that video tonight. It's still not perfect, but it's better! Here it is:
- YX
All that said, I finally reshot that video tonight. It's still not perfect, but it's better! Here it is:
14 November 2013
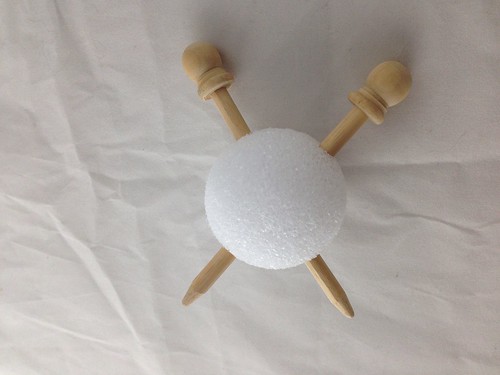
Yarn ball ornaments
I love all of the knitted holiday ornaments that I see in stores and on Ravelry. Unfortunately for me, I don't have the patient to knit a million little sweaters or mittens or penguins.
But I can make these:
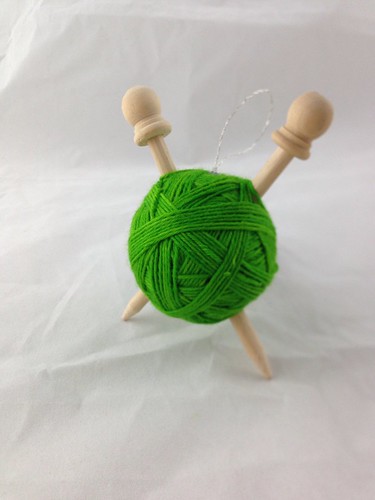
But I can make these:
These little yarn ball ornaments are pretty easy to make, and make use of your scrap yarn. I've been meaning to make these for a few years now, and I'm happy to show you my process!
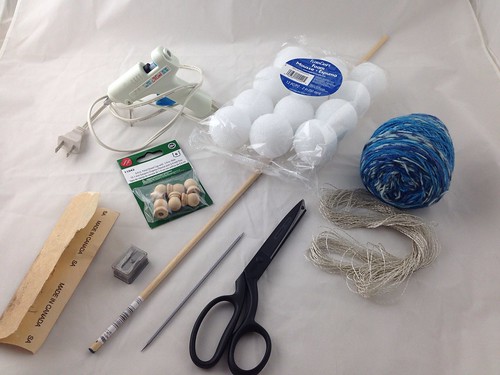
Materials:
2" Styrofoam Balls
1/4" dowels
Caps for the dowels
Silver cording (I used embroidery floss)
Sand paper
Scissors
Pencil sharpener
Something to cut the dowels (not pictured)
A thin, sharp knitting needle (optional)
Some type of glue. (I chose 1991's favorite adhesive, my trusty hot glue gun.)
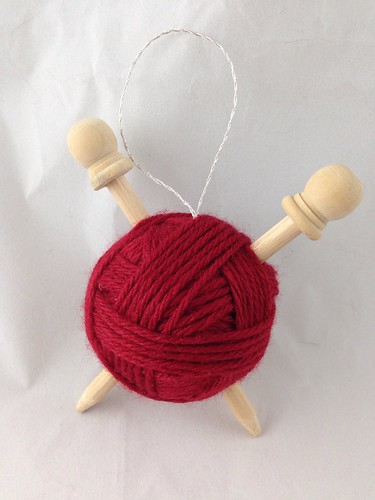
Scrap yarn (The green ornament uses fingering yarn, the red one at the end of the tutorial is worsted)
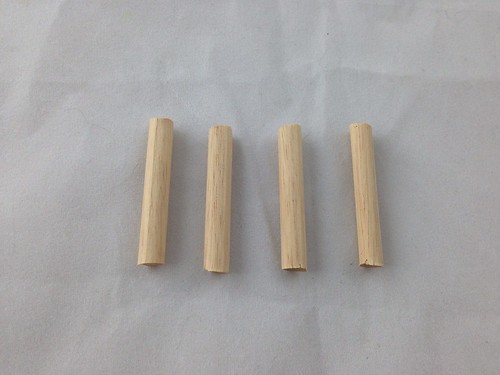
Step 1:
Cut dowels into 1-1/2" pieces. I used a model-making chopper for this, but strong scissors, wire cutters, or a hand saw could do the same.
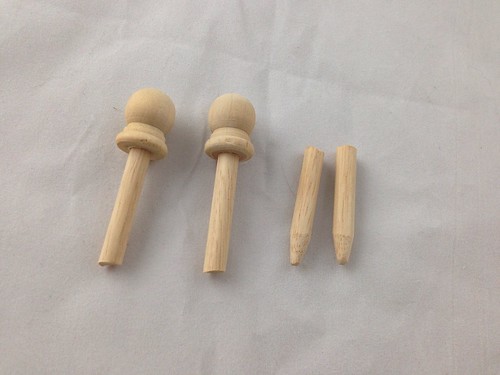
Step 2:
Use the pencil sharpener to sharpen the ends of two of the dowel segments. Use sandpaper to blunt the ends of the points. Place the caps on the remaining two dowel segments. The caps held on to the dowels with friction, but you could use a good white craft or wood glue if they don't.
Step 3:
Stick dowel segments into a styrofoam ball, being careful to line up the segments so they look straight and continuous.
I used a sharp knitting needle to make holes all the way through the styrofoam, which showed me exactly the angle I needed to use to place the dowels into the ball.
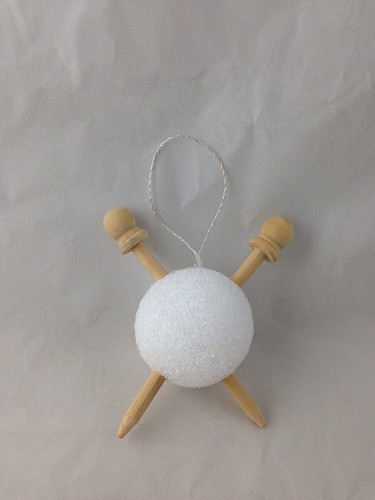
Step 4:
Glue the dowel segments to the styrofoam, and make a small hole in the top of the ball, sticking both ends of a piece of cording into the hole. Glue cording in place. (I used 4" of cording)
Step 5:
Wrap your scrap yarn around the ball multiple times, in many directions. I didn't even secure the starting end of the yarn, I just overlapped it enough that it held. When I was finished, I slipped the yarn under the wraps and stuffed it under wraps in an opposite direction. Sometimes I could find a little hole of styrofoam and mash the end into the foam, securing with a teeny bit of glue.
Wrap your scrap yarn around the ball multiple times, in many directions. I didn't even secure the starting end of the yarn, I just overlapped it enough that it held. When I was finished, I slipped the yarn under the wraps and stuffed it under wraps in an opposite direction. Sometimes I could find a little hole of styrofoam and mash the end into the foam, securing with a teeny bit of glue.
Ta-da! Knitting ornaments!
You could paint or stain the "needles", use i-cord or crochet chains in place of regular yarn, put beads on the yarn... Lots of options! You could even use some large, pretty beads for the needle ends.
If you make these ornaments, send me a picture and I'll be sure to share it here!
Happy holidays!
- YX
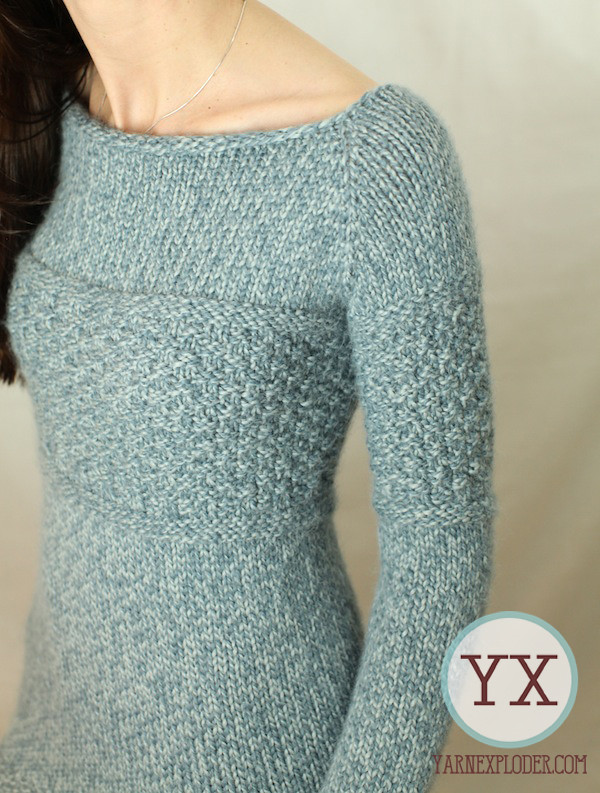
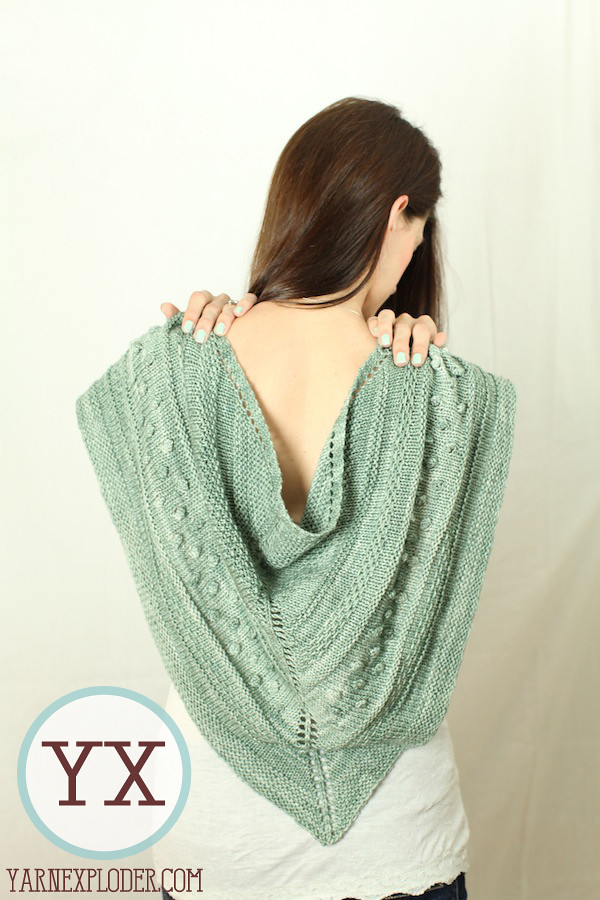
30 July 2013
Technique: Cables
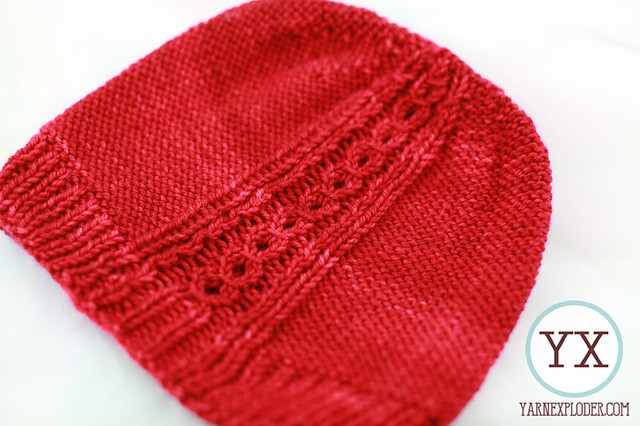
Awhile ago, I was talking about knitting techniques I love or would like to learn. Today's is cable stitch patterns.
So, this is the most cabled project I've done:
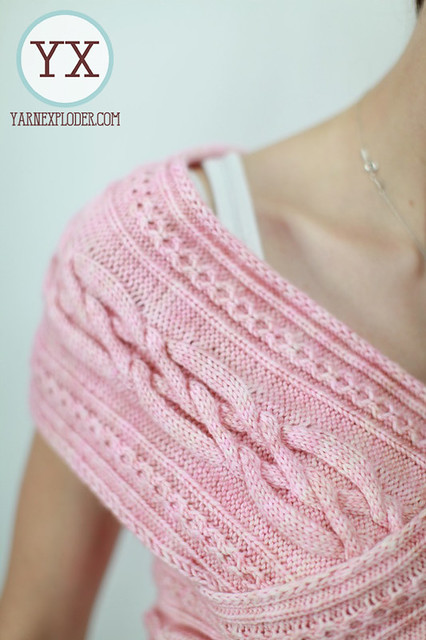 It's a pattern for a cowl, but I made it extra long and turned it into a crossbody vest thingy. I'm super happy with how it turned out, though I'd like to reblock it wider to show the details on the cables.
I've done some other cable projects, but I don't find myself particularly drawn to them. Indeed, there's something kind of annoying about having to remember which row is a cable row, which direction to cable, etc. Small projects can be quite fun, though:
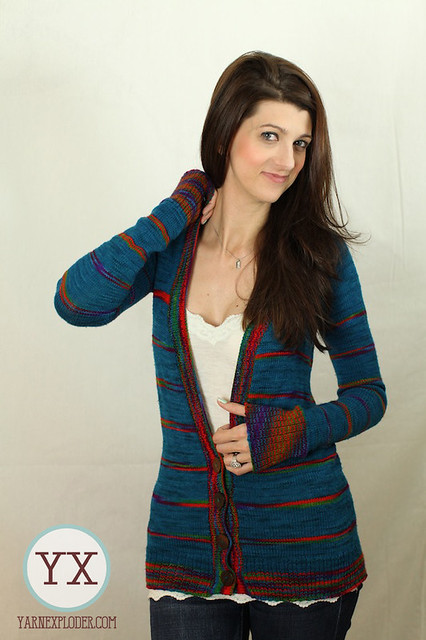
And I do enjoy them as a design element. My most recent sweater has a few cables, and they were fairly easy to manage:

There are always row counters to help, and quite a few people like cabling without cable needles. I've never been able to cable without a cable needle and have it come out properly. Like the linked video says, my knitting is too tight to make it work with anything more than a stitch or maybe two. Instead, I use a darning needle, which I stick into my yarn cake and use as a cable needle. I have some actual bent needles for cabling, but I find that the darning needle is twice as useful, and much smaller.
I'd like to do more things in the spirit of my Pinctada, but a girl can only have so many cowls in Texas...
 - YX
- YX
So, this is the most cabled project I've done:
I've done some other cable projects, but I don't find myself particularly drawn to them. Indeed, there's something kind of annoying about having to remember which row is a cable row, which direction to cable, etc. Small projects can be quite fun, though:
And I do enjoy them as a design element. My most recent sweater has a few cables, and they were fairly easy to manage:
There are always row counters to help, and quite a few people like cabling without cable needles. I've never been able to cable without a cable needle and have it come out properly. Like the linked video says, my knitting is too tight to make it work with anything more than a stitch or maybe two. Instead, I use a darning needle, which I stick into my yarn cake and use as a cable needle. I have some actual bent needles for cabling, but I find that the darning needle is twice as useful, and much smaller.
I'd like to do more things in the spirit of my Pinctada, but a girl can only have so many cowls in Texas...
20 May 2013
How to: Use RSS with Ravelry
I really love Ravelry's RSS options for monitoring friend activity, so I thought I'd show you how I keep tabs on everyone! My queue grows more by the day, but it's definitely a way I locate the patterns I love to show you guys!
- YX
16 April 2013
Technique: Buttonholes
Fasten up, friends! Today we're looking at buttonholes. I totally wanted to do some little swatchy examples of buttonholes for you, but I have totally screwed up my wrist and it's hard to knit! So instead we're getting chatty.
I've done a few projects with buttonholes. Not many. Although I love buttons and I like button closures, it seems like I end up with pullovers or open cardigans more than buttoned things. My first big buttonhole project was my sultan cardigan:
 Every time I look at this cardigan, I wish I'd added at least one more buttonhole:


I've done a few projects with buttonholes. Not many. Although I love buttons and I like button closures, it seems like I end up with pullovers or open cardigans more than buttoned things. My first big buttonhole project was my sultan cardigan:
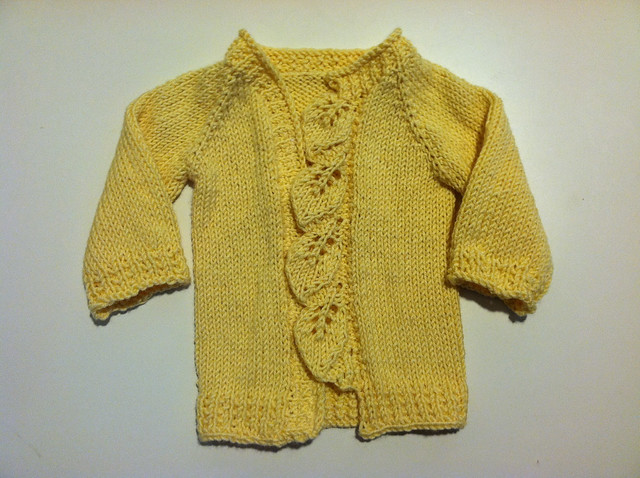
The button band for this cardigan is made by picking up and knitting perpendicular to the cardigan stitches. The holes are created by binding off a few stitches along the way, knitting to the end and turning the work, then casting back on when I get to the bound off stitches. It's a really easy way to make a traditional vertical buttonhole. In fact, I used the same strategy for this little baby sweater:
I had already purchased the buttons, so it was imperative that the holes were correctly sized. I always side with a little tighter fit with the buttons, but the star shape of these buttons meant they'd stay fastened better without a fight. Important, since you're trying to get a sweater on a tiny baby who doesn't understand the need for fashionable closures. Sheesh, children, get it together.
I did one more baby cardigan with buttons, and it utilizes a yarnover buttonhole:
It's impossible to see then, but the holes are just above the leaf stems on the buttonband. Essentially, these are done by creating a yarnover k2tog, then knitting or purling back across those stitches. It makes a tiny little hole that is perfect for small buttons.
There's a new type of buttonhole, called the Tulips buttonhole, that interests me quite a bit. I'll probably give it a shot on my next buttoned project. The lovely Eunny Jang shows us how to make the buttonhole, which was created by TECHknitter:
There's also a knitty article that shows the basic buttonholes I've talked about above, if you'd like an illustrated walkthrough done by someone without a bum wrist!
There's also this illustrated guide for button loops that showed up on Pinterest and linked back to a Chinese site... Does anyone recognize it? I'd love to know if this is from a book or what. Click to enlarge:
Creative Knitting's newsletter shows some buttonholes, but more importantly, a great way to reinforce standard buttonholes, for those of you who want to go back and tighten up your older holes (WOAH let's not read too much into that, okay?)
Do you have a great buttonhole reference you use? Do you just follow the patterns as written? Tell me everything!
- YX
10 April 2013
How to: Photographing knitwear
This morning has been rainy and a bit dull, and on top of everything, I've somehow hurt my wrist! Since my knitting has slowed down, I figured I'd do a little instructional video on my process for photographing knitwear:
I hope you enjoyed it!
- YX
16 March 2013
Technique: Bobbles
I'm still working on my list of techniques from the last post. Don't worry, I plan to mix these up with other content, but felt like this would be a fun topic for today!
Bobbles... Have you made them? Do you love them? Hate them? I think, generally speaking, I don't know many knitters who jump at the chance to knit bobbles on their projects.
Texelle was my first bobble project:
 These (and most) bobbles were made by increasing into a stitch, knitting back and forth on those increases for a few rows before decreasing back down to one, and moving on to the next stitch.
Around the same time, I also worked on Erikson, which has a bobble motif that imitates metal studs:
They're interesting little design elements that can really add dimension to knitting. Though you have to be careful... A row of them across the bust might not be the best placement option...
- YX
Bobbles... Have you made them? Do you love them? Hate them? I think, generally speaking, I don't know many knitters who jump at the chance to knit bobbles on their projects.
Texelle was my first bobble project:
Around the same time, I also worked on Erikson, which has a bobble motif that imitates metal studs:
They're interesting little design elements that can really add dimension to knitting. Though you have to be careful... A row of them across the bust might not be the best placement option...
- YX
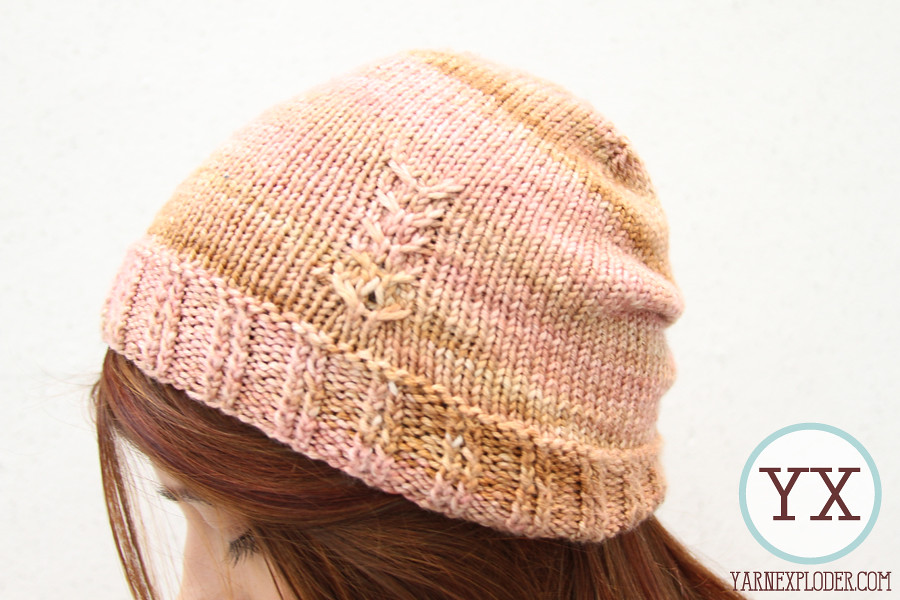
10 March 2013
Undereducated: Knitting techniques
One of my lovely readers asked me to write a blog post about knitting techniques I'd like to learn. I found a huge list of techniques via Google, so to begin with, I pared the list down to remove things like project types, since those aren't techniques as much as a combination of things. I also removed references to dyeing or spinning, since those aren't knit-related. Now, although my primary goal is to talk about what I want to learn, I will add some anecdotes about the things I have learned... Primarily for your amusement. Here's the list:
American/English knitting and Continental knitting
Bobbles
Buttonholes
Cable stitch patterns
Combination knitting
Darning
Designing knitted garments
Domino knitting
Drop stitch patterns
Entrelac
Fair Isle knitting
Free-form knitting
Fulling/felting
Garter stitch
Graffiti knitting
I-cord
Intarsia
Kitchener stitch
Knitting and purling backwardsLace patterns
Long Tail CO
Machine knitting
Moebius band knitting
Norwegian knitting
Short rows
Slip stitch patterns
Steeks
Stockinette stitch
Swatching
Tassels
Textured knitting
Thrummed knitting
Tubular CO
Twisted stitch patterns
Two end knitting
So I'll start with American/English knitting. Have I ever told you how I learned to knit? With a Lion Brand boucle scarf kit? Yeah, the instructions would've been better if they were written by Ikea. Luckily, I was able to find the excellent resource that is Knittinghelp.com, and things became much clearer.
Now, I'm not sure why I chose English over continental. I think, most likely, it was because I'm so utterly right handed that trying to control the yarn in my left hand was doomed from the start. Now, I knit English with a few weird nuances, like keeping my right thumb against the needle when I "throw"... Would you like to see me knitting something? You would?! How about this:
Lovely! Now, I normally knit a bit faster and more fluidly when my hands aren't around a tripod and reaching into a lightbox... :D
I'd love to learn to knit continental. The fact is, I do know how to knit like that, but my left hand is so bad at keeping tension that it just seems useless to keep going at it. I get my projects done quickly enough without the extra efficiency of continental, so I think I'll just stay happy with this way, until I come up with something better.
How do you knit?
- YX
American/English knitting and Continental knitting
Bobbles
Buttonholes
Cable stitch patterns
Combination knitting
Darning
Designing knitted garments
Domino knitting
Drop stitch patterns
Entrelac
Fair Isle knitting
Free-form knitting
Fulling/felting
Garter stitch
Graffiti knitting
I-cord
Intarsia
Kitchener stitch
Knitting and purling backwardsLace patterns
Long Tail CO
Machine knitting
Moebius band knitting
Norwegian knitting
Short rows
Slip stitch patterns
Steeks
Stockinette stitch
Swatching
Tassels
Textured knitting
Thrummed knitting
Tubular CO
Twisted stitch patterns
Two end knitting
So I'll start with American/English knitting. Have I ever told you how I learned to knit? With a Lion Brand boucle scarf kit? Yeah, the instructions would've been better if they were written by Ikea. Luckily, I was able to find the excellent resource that is Knittinghelp.com, and things became much clearer.
Now, I'm not sure why I chose English over continental. I think, most likely, it was because I'm so utterly right handed that trying to control the yarn in my left hand was doomed from the start. Now, I knit English with a few weird nuances, like keeping my right thumb against the needle when I "throw"... Would you like to see me knitting something? You would?! How about this:
I'd love to learn to knit continental. The fact is, I do know how to knit like that, but my left hand is so bad at keeping tension that it just seems useless to keep going at it. I get my projects done quickly enough without the extra efficiency of continental, so I think I'll just stay happy with this way, until I come up with something better.
How do you knit?
- YX
10 February 2013
Hand knitting
What happened to my week? I can't believe it's already Sunday...
I happened upon this Lifehacker post that shows a method for knitting without needles:
I find it interesting... My biggest needles are a whopping size US 50, which I've used once or twice on those lovely, bulky cowls that are quick gifts. Although I don't think this kind of knitting is generally something I'd be interested in playing with too much, it would be effective for making a bath mat with some cotton rope or old towel strips.
It also reminds me somewhat of finger knitting:
For me, this kind of stuff is so fun to teach kids. I remember being at Girl Scout camp as a kid, making quick friendship bracelets by using the finger crochet method:
Have you guys ever tried any of these "hand knitting" methods? Do you think they have the potential to do more than just basic items?
- YX
I happened upon this Lifehacker post that shows a method for knitting without needles:
It also reminds me somewhat of finger knitting:
- YX
28 August 2012
Favorite types of yarn
There was a post on Ravelry awhile back about favorite yarn weight... That one's easy, for me: DK. DK (Double Knit) yarn is between sport and worsted weights, and it's thicker than sock (fingering) yarn. For reference, if I hold two strands of sock yarn, I get what is approximately a worsted weight. I like DK because I can sub it for anything from a fingering weight to a worsted and get nice results. That may sound crazy, but it always seems to work out in gauge for me.
 That is a dk-weight shawl, made from Tosh Merino dk. The pattern called for lace, but a hard blocking left me with a scarfy shawl that had more substance than a lace would give me. And, if I'm being wholly honest, I tend to like the colorways in dk yarns better than others.
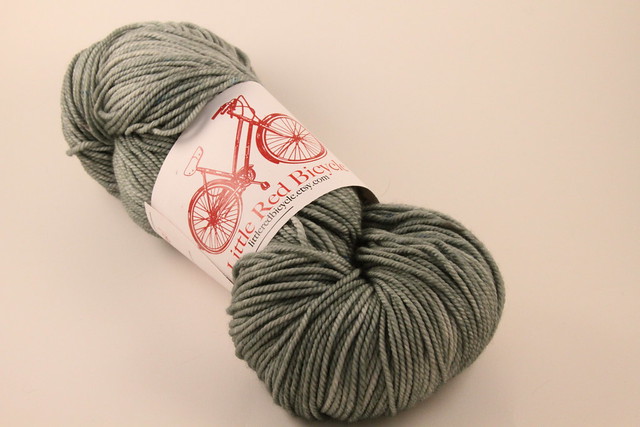
But I wasn't planning on talking weight, anyway. I wanted to talk about structure. And I'm going to use the lovely yarns from Little Red Bicycle to illustrate.
Okay, so there are so many ways to make yarn. There are single ply yarns, which are just spun fiber. They're kind of fuzzy and tend to pill more than their plied counterparts. Here's a single:

2-ply yarns are like singles, except they're half as thick, and two of them are twisted together. A lot of lace yarns are 2-ply, but sock yarns can be, too:

Here's a 3-ply, which adds another ply to the mix. It looks twistier, doesn't it?:

There's a 3-ply technique called Navajo plying, which takes one long single and spins it in such a way that it actually creates three plies as you spin it, which is kind of neat! Here's an example from Eleven Hills on Etsy:

There are a ton of other plying/spinning methods to create yarn, too. Boucle, for example, is made by using two different tensions on singles. So you get loopy bits all of the yarn. My favorite type of ply, though, is a braided ply, like Cascade Eco Cloud:
 Can you see the difference here? It's like a bajillion little chains make up the yarn. I find it's wonderfully stretchy and mooshy, and you can knit up something bulky that doesn't weight too much, because the yarn isn't solid... All those teensy gaps act like air pockets when knitted up. It's not as robust as a super twisty yarn, and it doesn't shed or pill as much as a single-ply yarn.
One of my favorite pairs of socks were knitted from a braided cashmere yarn, and I was too much of a beginner to realize how incredible it was... The ball band is long lost, and I wish I could figure out what the brand was! I wouldn't call braided yarns rare, but the few you see are generally pretty plain. I'd love to see an indie dyer experimenting with them, though!
Tell me your favorites, or help me solve my mystery yarn! It's definitely a high percentage of cashmere, and that's just about all I know.
-YX
(I'll be picking a giveaway winner soon!)

But I wasn't planning on talking weight, anyway. I wanted to talk about structure. And I'm going to use the lovely yarns from Little Red Bicycle to illustrate.
Okay, so there are so many ways to make yarn. There are single ply yarns, which are just spun fiber. They're kind of fuzzy and tend to pill more than their plied counterparts. Here's a single:

2-ply yarns are like singles, except they're half as thick, and two of them are twisted together. A lot of lace yarns are 2-ply, but sock yarns can be, too:

Here's a 3-ply, which adds another ply to the mix. It looks twistier, doesn't it?:

There's a 3-ply technique called Navajo plying, which takes one long single and spins it in such a way that it actually creates three plies as you spin it, which is kind of neat! Here's an example from Eleven Hills on Etsy:

There are a ton of other plying/spinning methods to create yarn, too. Boucle, for example, is made by using two different tensions on singles. So you get loopy bits all of the yarn. My favorite type of ply, though, is a braided ply, like Cascade Eco Cloud:

One of my favorite pairs of socks were knitted from a braided cashmere yarn, and I was too much of a beginner to realize how incredible it was... The ball band is long lost, and I wish I could figure out what the brand was! I wouldn't call braided yarns rare, but the few you see are generally pretty plain. I'd love to see an indie dyer experimenting with them, though!
Tell me your favorites, or help me solve my mystery yarn! It's definitely a high percentage of cashmere, and that's just about all I know.
-YX
(I'll be picking a giveaway winner soon!)
24 August 2012
FO: Baby Tesla
I couldn't blog at all about my most recent FO, but now that it has been properly gifted, I can show you:
 I have three lousy photos of the thing, because I didn't have time to take real photos before it went out the door, but seeing as it's just a simple baby sweater, I find the photos do it justice.
It's a simple raglan cardigan done in Wollmeise sock yarn. The colorway is Chim Chim Chimney, which I had left over from this project:

The image at top is more accurate to the color. I did the raglan increase, and knitted the front button band in garter stitch, which you can't see here. The back band is picked up and knitted on in normal ribbing, but I really liked the texture of the garter on the front.
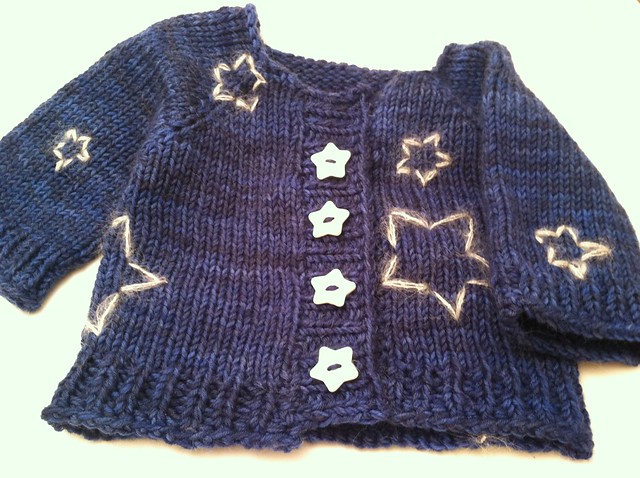
I did little embroidered stars on it, which remind me a little of the sweater in the movie Coraline:

The embroidery wasn't easy to get right... I wanted it to look hand drawn/ scribbly, like the kinds of stars I drew as a kid. I tried all kinds of embroidery stitches and settled on a backstitch, which is super plain but I figured it'd be easy to pick out/remove if mom and dad don't like it.
The mom of the recipient has been looking at "science-y" middle names for her baby, so I thought the stars would fit in well. Maybe he'll be an astrophysicist some day!
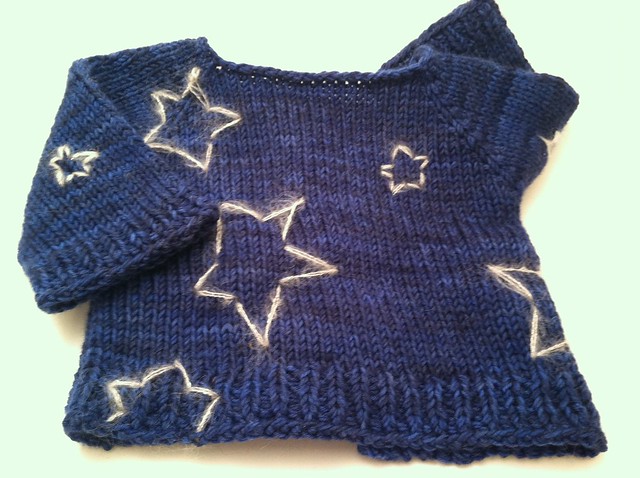
I suggested she consider Tesla for a middle name, because he was a science badass and, obviously, because his name sounds super cool. Don't mess with Tesla!
- YX
It's a simple raglan cardigan done in Wollmeise sock yarn. The colorway is Chim Chim Chimney, which I had left over from this project:

The image at top is more accurate to the color. I did the raglan increase, and knitted the front button band in garter stitch, which you can't see here. The back band is picked up and knitted on in normal ribbing, but I really liked the texture of the garter on the front.
I did little embroidered stars on it, which remind me a little of the sweater in the movie Coraline:

The embroidery wasn't easy to get right... I wanted it to look hand drawn/ scribbly, like the kinds of stars I drew as a kid. I tried all kinds of embroidery stitches and settled on a backstitch, which is super plain but I figured it'd be easy to pick out/remove if mom and dad don't like it.
The mom of the recipient has been looking at "science-y" middle names for her baby, so I thought the stars would fit in well. Maybe he'll be an astrophysicist some day!
I suggested she consider Tesla for a middle name, because he was a science badass and, obviously, because his name sounds super cool. Don't mess with Tesla!
- YX
14 August 2012
Knitting in Public
Every week, I meet up with my knitting group. There are nine of us, and we vary in age, background, beliefs... pretty much any possible way you can differ. They're some of my most favorite people to hang out with. Our location changes, and we rarely talk about actual knitting, but we meet up and let our fingers do the crafting while we share histories, stresses, excitment, and TONS of laughing.
I could brag on my knit group for an entire post, but one of the best unintended consequences of being in the group is we knit in public, but no one bugs us about it. Maybe it's intimidating to approach a group, or we just give off a hostile vibe. (Ha!)
That seems like an odd thing to be thankful for, but it's frustrating to be out somewhere, probably a doctor's office or airport terminal or some other horrifically boring wait-cage, and have someone sidle up to you with pity and "helpful words of encouragement," like:
"Did you know you can buy those things pre-made? Hurr Hurr"
No, friendly stranger, I had no idea. Pre-made socks and sweaters? I do declare. Now I'll have all this free time to navel-gaze or flip through a five-month-old, greasy copy of Reader's Digest. Thank you for your thoughtful insight!
 Here's the thing... I know I can buy a sweater for much cheaper than I bought this one. I also know that it may have synthetic content, making it machine washable. I know that I can buy fifteen of them from fifteen stores in fifteen days and still not finish my one handknit one. But you know what? I decided to make this one with my hands. It fits me perfectly, since I adjusted the stitch count to compensate for my proportions. I picked out the color I really wanted that no one seems to carry right now, and I spent my nights knitting it in front of the tv-- feeling much less guilty because I was actually accomplishing something. And that's valuable to me. It's valuable in the same way that building a house or rebuilding a car is valuable on a personal level. So go buy your own sweater at Wal-Store, Jack.
"Gosh, I just don't know how you find the time to do that. I'm so busy, I just couldn't even finish something!"
Wow, this is like a condescending hat trick! I must be bored, lazy, and less interesting than you!
 Or I'm doing it in the 45 minutes that I've been sitting here waiting on the doctor (and how are those docs allowed to DO that, anyway?). I've been knitting while I watch tv or read a book or sit in the car on the way to work. I've knitted on planes or in line at the DMV. I don't mark off hours on my daily planner to sit down and work in an uninterrupted manner. It meshes with my life. It's portable. Portable enough that I'm going to get up and walk over here now, kbai.
"What are you, like 60 years old?!"
No, really. I have actually had a total stranger say that to me. One with a soul patch.
 First off, if I haven't made it abundantly clear with the Golden Girls references, I see no issue with being compared to, like, a 60-year-old. You can be active, interesting, and share a condo in Florida with your three best girlfriends and go out all the time. Seems to me that 60-year-olds are just 20-year-olds with no jobs and retirement funds. Sign me up.
Secondly, it's apparent that people of many ages knit. See, I can prove this because I am knitting and I am in my 20's. Children can knit. Get this: men can knit, too! You could be making use of your hands for something other than a tired Trent Reznor impersonation by learning a skill!
I love interactions where people are genuinely interested. I'll always answer if someone wants to know what I'm making, or what craft I'm doing ("Are you sewing something?"). I'll point them toward resources if they say they always wanted to learn, or I'll say thank you if I get a compliment. Those folks are awesome.
So there you have it. Be nice, or face the wrath of Blanche!
- YX
(Win some patterns!)
I could brag on my knit group for an entire post, but one of the best unintended consequences of being in the group is we knit in public, but no one bugs us about it. Maybe it's intimidating to approach a group, or we just give off a hostile vibe. (Ha!)
That seems like an odd thing to be thankful for, but it's frustrating to be out somewhere, probably a doctor's office or airport terminal or some other horrifically boring wait-cage, and have someone sidle up to you with pity and "helpful words of encouragement," like:
"Did you know you can buy those things pre-made? Hurr Hurr"
No, friendly stranger, I had no idea. Pre-made socks and sweaters? I do declare. Now I'll have all this free time to navel-gaze or flip through a five-month-old, greasy copy of Reader's Digest. Thank you for your thoughtful insight!

"Gosh, I just don't know how you find the time to do that. I'm so busy, I just couldn't even finish something!"
Wow, this is like a condescending hat trick! I must be bored, lazy, and less interesting than you!

"What are you, like 60 years old?!"
No, really. I have actually had a total stranger say that to me. One with a soul patch.

Secondly, it's apparent that people of many ages knit. See, I can prove this because I am knitting and I am in my 20's. Children can knit. Get this: men can knit, too! You could be making use of your hands for something other than a tired Trent Reznor impersonation by learning a skill!
I love interactions where people are genuinely interested. I'll always answer if someone wants to know what I'm making, or what craft I'm doing ("Are you sewing something?"). I'll point them toward resources if they say they always wanted to learn, or I'll say thank you if I get a compliment. Those folks are awesome.
So there you have it. Be nice, or face the wrath of Blanche!
- YX
(Win some patterns!)
07 August 2012
What is a healthy stash?
There are tons of threads on Ravelry that allow posters to show off their yarn stashes. To the uninitiated, knitting is much like any hobby. Take origami, for instance:
 In order to make origami, you have to have paper. Paper is sold in packs. Lots of different patterns and textures of origami paper are available. Therefore, if one wants to make an origami magic unicorn, one will buy a pack of magic paper and make the unicorn. Once the unicorn's done, there is still a packet of paper (-1) left over.
Yarn is similar. A pattern calls for 1300 yards, but the skeins are 400 yards each, so instead of 4, you buy 5. But then, you knit below gauge and only use 4. But then, you keep the 5th ball instead of returning it because hey, some day it might get a hole and need to be patched, or perhaps this yarn might make a nice matching hat, since sweaters with matching hats are totally chic:

If I go into a yarn store, I don't always have a project in mind, either. Maybe there's a sale, or I'm in for a new needle and something pretty catches my eye. I might start going through possible projects for the skein, trying to sniff out the potential. I bring home the new yarn and plop it in a box, hoping to use it on my next project. Thus, stash is created.
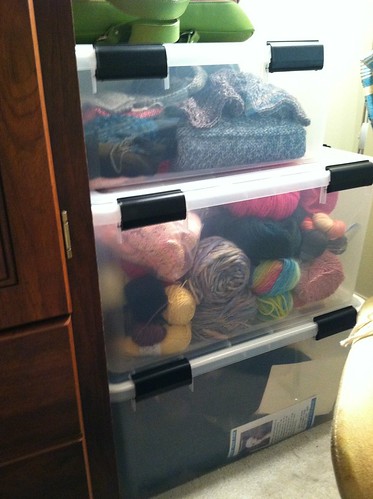
Stash levels vary from knitter to knitter. There are people who just buy what they need, return what they don't use, and donate any fractional amounts to thrift shops. There are people with a teeny little bag by the couch. There's me, with two unfilled boxes arranged in colors and neutrals:
And so on, and so on... until we reach professional yarn stashing levels. Mochimochiland did a blog post about a huge yarn stash that is as big (or bigger) than some yarn stores:

Which leads me to wonder: what's the "healthy" limit? Is there a point where you run out of time to knit all of the yarn you own (we call this SABLE: Stash Acquisition Beyond Life Expectancy)? Is it really so bad to have a ton of materials for a hobby? It's just yarn, right?
Depending on the amount of space one has, and the tolerance of roommates or family members, that amount could vary substantially. For me, I find myself getting a little depressed when my stash fills up my two little boxes. I look in there, remember all the potential I'd given to those purchases, and start to feel hopeless to achieve the goals. If I'm planning a big project, though, I generally DO buy new yarn for it (something that befits the pattern), so the majority of my stash is comprised of single balls that are completely unrelated. Looks like tons of accessories are in my future...
How about you? What's your stash like, and what's "too much"?
- YX

Yarn is similar. A pattern calls for 1300 yards, but the skeins are 400 yards each, so instead of 4, you buy 5. But then, you knit below gauge and only use 4. But then, you keep the 5th ball instead of returning it because hey, some day it might get a hole and need to be patched, or perhaps this yarn might make a nice matching hat, since sweaters with matching hats are totally chic:

If I go into a yarn store, I don't always have a project in mind, either. Maybe there's a sale, or I'm in for a new needle and something pretty catches my eye. I might start going through possible projects for the skein, trying to sniff out the potential. I bring home the new yarn and plop it in a box, hoping to use it on my next project. Thus, stash is created.
Stash levels vary from knitter to knitter. There are people who just buy what they need, return what they don't use, and donate any fractional amounts to thrift shops. There are people with a teeny little bag by the couch. There's me, with two unfilled boxes arranged in colors and neutrals:
And so on, and so on... until we reach professional yarn stashing levels. Mochimochiland did a blog post about a huge yarn stash that is as big (or bigger) than some yarn stores:
Which leads me to wonder: what's the "healthy" limit? Is there a point where you run out of time to knit all of the yarn you own (we call this SABLE: Stash Acquisition Beyond Life Expectancy)? Is it really so bad to have a ton of materials for a hobby? It's just yarn, right?
Depending on the amount of space one has, and the tolerance of roommates or family members, that amount could vary substantially. For me, I find myself getting a little depressed when my stash fills up my two little boxes. I look in there, remember all the potential I'd given to those purchases, and start to feel hopeless to achieve the goals. If I'm planning a big project, though, I generally DO buy new yarn for it (something that befits the pattern), so the majority of my stash is comprised of single balls that are completely unrelated. Looks like tons of accessories are in my future...
How about you? What's your stash like, and what's "too much"?
- YX
20 July 2012
So you want to learn to knit?
I have a few Facebook friends who admire the knitting projects I post there. They (and sometimes random strangers who see me knitting) often say they couldn't possibly figure out how to do something as complex as make a whole sweater.
If you've done more than a few projects, it becomes apparently how easy knitting is, which seems like a kind of injustice... The second things feel natural, all the knowledge that would've benefitted you in the beginning, nervous stages appears.
The thing is, knitting IS easy. Perhaps I'm betraying a legion of craftsmen and women when I say this, but it's a skill in which almost anyone can learn and become proficient.
I learned how to knit during winter break of my freshman year in college. I didn't knit religiously, and there were periods of months where I didn't knit at all. Within the last ten years as a knitter, I'd say I've probably been truly active for less than half of that time, and I'm comfortable with pretty much any knitting pattern that I wish to knit.
If you want to learn how to knit, there are tons of venues. There are classes and private lessons, books, and tons of resources on the internet. I started with an impulse buy at a craft store: a "Learn to Knit" kit that came with some utterly horrific boucle yarn, super large needles, and an incomprehensible pamphlet complete with single-color diagrams that did little to bolster my understanding of an entirely foreign concept.

One of the infuriating aspects of knitting is that the very first thing you do is "cast on" stitches to your needle... This creates little loops that will form the edge of your fabric, and forms the foundation for the rest of the knitted work. The thing is, the technique for casting on is not the same as normal knit stitches. And there's more than one way to do it, with multiple applications.
I struggled with casting on my first few stitches for days. This was before Ravelry, a great resource for knitters, and without friends or nearby relatives who could assist me in the crucial beginnings of my first little project. Soon enough, though, I figured it out, entirely due to stumbling upon Knittinghelp.com and the gloriously thorough videos there. I was on my way.
I never finished the scarf. I think I threaded the yarn through the loops I had, and tied a clumsy knot. I went on to my first real project:
 Knitting is comprised of a few basics: Knits, purls, slips, and yarnovers. Knits and purls create a new stitch on an existing loop. Slips are just moving existing loops to the next needle. Yarnovers are creating a stitch without an existing loop. Everything else really stems from these building blocks.
It's exciting when you get it right! And more exciting when you start to realize the things you can do with those skills! Other old-timers, leave me some stories about your learning curves in the comments!
- YX
(Yarn, yarn, yarn!)
If you've done more than a few projects, it becomes apparently how easy knitting is, which seems like a kind of injustice... The second things feel natural, all the knowledge that would've benefitted you in the beginning, nervous stages appears.
The thing is, knitting IS easy. Perhaps I'm betraying a legion of craftsmen and women when I say this, but it's a skill in which almost anyone can learn and become proficient.
I learned how to knit during winter break of my freshman year in college. I didn't knit religiously, and there were periods of months where I didn't knit at all. Within the last ten years as a knitter, I'd say I've probably been truly active for less than half of that time, and I'm comfortable with pretty much any knitting pattern that I wish to knit.
If you want to learn how to knit, there are tons of venues. There are classes and private lessons, books, and tons of resources on the internet. I started with an impulse buy at a craft store: a "Learn to Knit" kit that came with some utterly horrific boucle yarn, super large needles, and an incomprehensible pamphlet complete with single-color diagrams that did little to bolster my understanding of an entirely foreign concept.

One of the infuriating aspects of knitting is that the very first thing you do is "cast on" stitches to your needle... This creates little loops that will form the edge of your fabric, and forms the foundation for the rest of the knitted work. The thing is, the technique for casting on is not the same as normal knit stitches. And there's more than one way to do it, with multiple applications.
I struggled with casting on my first few stitches for days. This was before Ravelry, a great resource for knitters, and without friends or nearby relatives who could assist me in the crucial beginnings of my first little project. Soon enough, though, I figured it out, entirely due to stumbling upon Knittinghelp.com and the gloriously thorough videos there. I was on my way.
I never finished the scarf. I think I threaded the yarn through the loops I had, and tied a clumsy knot. I went on to my first real project:
It's exciting when you get it right! And more exciting when you start to realize the things you can do with those skills! Other old-timers, leave me some stories about your learning curves in the comments!
- YX
(Yarn, yarn, yarn!)
06 July 2012
Throwing caution to the wind
A quick perusal of my finished objects on Ravelry shows me that I've knitted one project in the pattern's suggested yarn. (It's Caliper, for those of you playing the home game) I love the finished samples in a pattern, and I appreciate the time and effort required to choose a yarn that compliments the design. That's awesome.
But I find that tracking down the exact yarn for a pattern doesn't work with my impulsive desires. Sometimes, a suggested yarn line doesn't have a flattering color. Perhaps I'd rather use superwash, or something with a smaller halo, or something with a twist for durability, instead of the delicate singles specified. Maybe (and this is usually the case), I want to use stash yarn.
The first step toward throwing caution to the wind is simple: subbing similar yarn. Something of a similar weight and fiber is guaranteed to end up alright.
Next is to stay in the same weight family. You have to consider the implications of the fiber types, and number of plies; the fabrics can drape differently. In my experience, the "silkier" a yarn is, the drapier the fabric will be.
Then, you get bolder. I've found that sport, worsted, DK, and fingering weight yarns tend to swap out reasonably well. Fingering yarn held double is supposed to equal worsted, so it's a likelier match than just subbing one for the other directly, but as long as the fabric's openness isn't of ultimate importance, it doesn't seem to make a bad product. Using a bulky weight on a lace shawl is probably a bad idea, but the sport weight that I subbed for the suggested DK in my Texelle had no effect on the project.
I'd love to hear your favorite stories of subbed yarns- good and bad. And links to the project pages!
- YX
(Get some free yarn for all of your yarn subbing needs here!)
27 March 2012
Photography 101: Lightboxes
Happy Tuesday! This is the first in a series of posts I plan to do on knit photography. I should note that I have ZERO training in photography, but this is based on my experience as I've stumbled through attempting to find good ways to document my projects.
There are tons of ways to take photos of finished objects, and I'll try to get to all of them, but for now I'm focusing on small objects, like toys, hats, gloves, and even skeins of yarn for your stash page.
I didn't use Ravelry's stash feature for AGES, and when I did, it was a series of badly-taken webcam photos that didn't represent the yarn in any useful way:
 The color in this photo is off, the lighting's uneven, and parts of it are blurry. I can't even get a good feeling for the texture of this yarn in the photo-- is it soft and light, like a fingering weight yarn, or is it super heavy bamboo? Is it scratchy or silky? This photo basically tells me nothing except that I own some yarn that looks fairly like rainbow sherbet.
Now, I take all of my small object photos using a curl or lightbox. This method results in photos that have a clean, white background with no "setting" in the shot.
(I'll talk more about backgrounds/settings in another post.) For stash images and most of the images on my site, I choose plain backgrounds that put the entire focus of the image on the object, without distractions.
To accomplish this look, you don't actually need any fancy equipment... A white sheet or piece of posterboard can make a curl. To start, just attach the material to a vertical plane (wall or chairback) and let the fabric or paper drape toward you, creating a gentle curve. If using posterboard, I tend to favor the matte side (the side that typically has the price sticker on it), so there's no reflectivity. Once you've created a curl, you have to determine your light sources.
Lighting can be approached many ways. Natural light obviously depends on the weather. Using the sun can be great (and cheap!) but the best results occur in the shade or on an overcast day, where you get all the ambient light of the sun with none of the harsh shadows.
 If using artificial light, I like to use opposing lights or a single overhead, diffused light. If you just put two lamps on opposite sides of a ball of yarn, you'd probably get some harsh shadows. Diffusing light makes it more even. A quick way to do this is via lampshades or the use of parchment paper. Parchment allows light to shine through, but breaks it up and makes it more even. It's also heat resistant, so BAM!
I followed a tutorial and constructed my own little lightbox. I then went to Home Depot and bought two cheap worklights and two "daylight" bulbs. My final result was this:
 I'm using parchment on the sides to diffuse the light, which creates a great, even glow in the space. You can buy premade tents, but I like this as a cheap alternative. I keep this box in my guest room, under a lamp with a white bulb, so I can just turn on the light and get a good, quick image from it. In fact, the photos from yesterday's post were taken in the tent, with just the overhead lamp!
 Super easy! Do you have any tricks for small photos like this?
- YX
Don't forget! Just a few more days to enter and win!
There are tons of ways to take photos of finished objects, and I'll try to get to all of them, but for now I'm focusing on small objects, like toys, hats, gloves, and even skeins of yarn for your stash page.
I didn't use Ravelry's stash feature for AGES, and when I did, it was a series of badly-taken webcam photos that didn't represent the yarn in any useful way:
Now, I take all of my small object photos using a curl or lightbox. This method results in photos that have a clean, white background with no "setting" in the shot.
To accomplish this look, you don't actually need any fancy equipment... A white sheet or piece of posterboard can make a curl. To start, just attach the material to a vertical plane (wall or chairback) and let the fabric or paper drape toward you, creating a gentle curve. If using posterboard, I tend to favor the matte side (the side that typically has the price sticker on it), so there's no reflectivity. Once you've created a curl, you have to determine your light sources.
Lighting can be approached many ways. Natural light obviously depends on the weather. Using the sun can be great (and cheap!) but the best results occur in the shade or on an overcast day, where you get all the ambient light of the sun with none of the harsh shadows.
I followed a tutorial and constructed my own little lightbox. I then went to Home Depot and bought two cheap worklights and two "daylight" bulbs. My final result was this:

- YX
Don't forget! Just a few more days to enter and win!
13 November 2011
Knitting beverages
I love knitting. This is probably apparent due to, you know, the whole blog thing.
But there's nothing better to me than sitting in a great comfortable chair, with a warm glass of sweetened herbal tea. There's something so simple about it, but it definitely takes my knitting from a crafting activity to a relaxation activity. The warmth of the drink means I have to sip frequently, which gives my hands a break, too!
How about you guys? What do you drink while you knit?
Oh, and here's a bonus-- New FO photos of my caliper, including my toggle button, thanks to Blue Lab Workshop:


How about you guys? What do you drink while you knit?
Oh, and here's a bonus-- New FO photos of my caliper, including my toggle button, thanks to Blue Lab Workshop:
- YX
Subscribe to:
Posts (Atom)